Page 188 - My FlipBook
P. 188
;
176 MECHANICAL DENTISTRY AND METALLURGY
are indicated. Remove the crown and with a small saw
revoked by the dental engine saw out the portion indicated.
The crown in this condition is represented in a and b, Fig.
142. Bevel the inner edge or seat for the facing with a
plug finishing bur or small stone. Select a suitable facing
and grind to fit (a, Fig. 143). Back the facing with pure
gold, 34 or 36 gauge, punching h(jles in the Ijacking for
Fig. 142. Fig. 143-
^
the pins, annealing- as required and l)urnishing to conform
to tooth, as indicated in b, Fig. 143. With a sharp knife
or chisel cut a barb on each of the pins in the facing and
press Imrbs down against the l^acking to
keep it in place until the solder makes a
permanent attachment. This is shown in c,
Fig. 143. Press the facing into open face
of the crown, bind the two together with
wire, that portion of the wire covering the
porcelain to be covered with asbestos, to
prevent discoloration. Flux, and place a
little solder on the inside at the union of
the backing and the crown and in the cusps
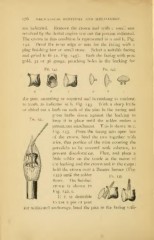
hold the crown over a Bunsen burner (Fig.
144) until the solder p,,-.
145-
flows. The finished
crown is shown in
Fig. 142, c.
If it is desirable
to use a pin or post
for additional anchorage, bend the pins in the facing suffi-
176 MECHANICAL DENTISTRY AND METALLURGY
are indicated. Remove the crown and with a small saw
revoked by the dental engine saw out the portion indicated.
The crown in this condition is represented in a and b, Fig.
142. Bevel the inner edge or seat for the facing with a
plug finishing bur or small stone. Select a suitable facing
and grind to fit (a, Fig. 143). Back the facing with pure
gold, 34 or 36 gauge, punching h(jles in the Ijacking for
Fig. 142. Fig. 143-
^
the pins, annealing- as required and l)urnishing to conform
to tooth, as indicated in b, Fig. 143. With a sharp knife
or chisel cut a barb on each of the pins in the facing and
press Imrbs down against the l^acking to
keep it in place until the solder makes a
permanent attachment. This is shown in c,
Fig. 143. Press the facing into open face
of the crown, bind the two together with
wire, that portion of the wire covering the
porcelain to be covered with asbestos, to
prevent discoloration. Flux, and place a
little solder on the inside at the union of
the backing and the crown and in the cusps
hold the crown over a Bunsen burner (Fig.
144) until the solder p,,-.
145-
flows. The finished
crown is shown in
Fig. 142, c.
If it is desirable
to use a pin or post
for additional anchorage, bend the pins in the facing suffi-