Page 121 - My FlipBook
P. 121
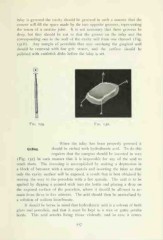
inlay is grooved the cavity should be grooved in such a manner that the
cement will fill the space made by the two opposite grooves, representing
the tenon of a mortise joint. It is not necessary that these grooves be
deep, but they should be cut so that the groove on the inlay and the
corresponding one in the wall of the cavity will form one channel (Fig.
131 B). Any margin of porcelain that may overhang the gingival wall
should be removed with fine grit stones, and the surface should be
polished with cuttlefish disks before the inlay is set.
Fig. 129. Fig. 130.
When the inlay has been properly grooved it
Etching. should be etched with hydrofluoric acid. To do this
requires that the margins should be invested in wax
(Fig. 132) in such manner that it is impossible for any of the acid to
reach them. The investing is accomplished by making a depression in
a block of beeswax with a warm spatula and inserting the inlay so that
only the cavity surface will be exposed, a result that is best obtained by
searing the wax to the porcelain with a hot spatula. The acid is to be
applied by dipping a pointed stick into the bottle and placing a drop on
the exposed surface of the porcelain, where it should be allowed to re-
main from three to five minutes. The acid should then be neutralized by
a solution of sodium bicarbonate.
It should be borne in mind that hydrofluoric acid is a solvent of both
glass and porcelain, and that it must be kept in a wax or gutta percha
bottle. This acid attacks living tissue violently, and in case it comes
117