Page 293 - My FlipBook
P. 293
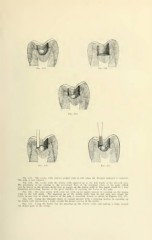
Fig. 133. Tiie cavity with concave pulpal wall as left when the decayed material is removed.
The pulp is not exposed.
Fia. 134. The cavity with the dentin walls squared up to the full depth of the decayed area.
The proximity of the cutting to the recessional lines of the marginal crests of the pulp, which
may be traced in the picture, shows that to square up the dentin walls to this depth would be a very
dangerous proceeding, because of the great liability of exposing the horns of tlie pulp.
Fig. 135. Tlie same cavity with ledge cut with square angles instead of squaring up the dentin
walls to the full depth. The squaring up of the dentin walls may be but part way round the
cavity in any case in which exposure of the pulp is especially feared, as shown in Figures 136, 137.
Fia. 136. Using the binangle chisel or enamel hatchet with a scraping motion in squaring up
the dentin wall and cutting a ledge around the deeper portion of the cavity.
Fig. 137. Using the fissure bur for squaring up the dentin walls, and cutting a ledge around
the deeper part of the cavity.