Page 216 - My FlipBook
P. 216
i84 FILLING MATERIALS
4. Direction.—Pack in the general direction of the long1
axis of the tooth, wherever possible, in order to avoid lat-
eral strain on the pericementum and to place the layers of
gold in a plane with the plane of the forces of occlusion, so
that the crushing stress may be resisted to the utmost (Fig.
209).
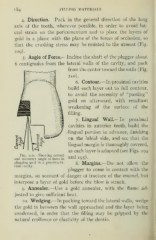
5. Angle of Force.—Incline the shaft of the plugger about
6 centigrades from the lateral walls of the cavity, and pack
from the center toward the walls (Fig.
210).
6. Contour.—In proximal cavities
build each layer out to full contour,
to avoid the necessity of '^ pasting"
gold on afterward, with resultant
weakening of the surface of the
filling.
7. Lingual Wall.—In proximal
cavities in anterior teeth, build the
lingual portion in advance, finishing
on the labial side, and see that the
lingual margin is thoroughly covered,
as each layer is adapted (see Figs. 194
Fig. 210. -Showing correct
and 195).
and incorrect angle of force in
plugging gold in a proximo-in-
8. Margins.—Do not allow the
cisal cavity.
plugger to come in contact with the
margins, on account of danger of fracture of the enamel, but
interpose a layer of gold before the blow is struck.
9. Annealer.—Use a gold annealer, with the flame ad-
justed to give sufficient heat.
10. Wedging.—In packing toward the lateral walls, wedge
the gold in between the wall approached and the layer being
condensed, in order that the filling may be gripped by the
natural resilience or elasticity of the dentin.