Page 357 - My FlipBook
P. 357
Fig. 192. Fig. 193.
Fiti. 194.
Fig. 195. Fig. 196.
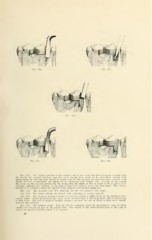
Fig. 102. The occlusal portion of the onainol wall of the cavity has been trimmed to fonii with
tlie chisels and enamel hatchets, and the cavity having been made fit for immediate sealing with
gutta-percha in case the pulp should be found exposed, the decayed material has been removed with
spoons 20-0-12, as described and illustrated in connection with Figure 132. A ledge is cut around
the cavity in the occlusal portion for the reason that the depth of this is found to be so great as to
seriously endanger the exposure of the pulp if this were squared up to the full depth. The enamel
hatchet is in position cutting the enamel of the gingival wall farther gingivally.
Fig. 193. The inverted cone bur squaring out the axio-gingival line angle.
Fig. 194. The chisel cutting the buccal wall, exte-nding it farther buccally.
Fig. 195. The gingival margin trimmer in position giving a slight bevel to the gingival cavo-
surface angle. Notice particularly the angle of the cutting edge of this instrument and its adaptation
to this work. The pair of gingival margin trimmers designed for use in distal cavities serve equally
well for that position.
Fig. 196. The finished cavity. Note in this the rounding about the mesio-buccal cusp, avoiding
cutting the recessional line of the pulpal horn. The length of the mesio-buccal horn of the pulp is
always an unsolved problem until it is exposed.
22